
内容一:rpm 简介
1) rpm 是 CentOS、RHEL、openSUSE、SUSE 的软件安装包
2) rpm 是使用 cpio 格式压缩成的包
内容二:解压 rpm 文件的方法
# rpm2cpio <文件名> | cpio -div(补充:解压之后就可以看到如果安装这个 rpm 文件的话,有哪些目录和文件会被创建)
1) rpm 是 CentOS、RHEL、openSUSE、SUSE 的软件安装包
2) rpm 是使用 cpio 格式压缩成的包
# rpm2cpio <文件名> | cpio -div(补充:解压之后就可以看到如果安装这个 rpm 文件的话,有哪些目录和文件会被创建)
1) http_proxy
2) https_proxy
3) ftp_proxy
4) socket_proxy
5) all_proxy
6) no_proxy
(
补充:
1) 变量可以使用通配符
2) 添加多个变量时可以使用 “,” 号分割
3) 不填种类默认以 http 协议传输
)
export <environment variable>=http://<IP address>:<port>export <environment variable>=https://<user>:<password>@<IP address>:<port>(注意:如果密码中也有一个 “@” 符号,则需要把 “@” 符号转义一下,转义成 %40)
1) /etc/profile
2) ~/.bashrc
3) /etc/profile.d/<文件名前缀>.sh
# reboot# source /etc/profile# echo $http_proxy# echo $https_proxy# echo $ftp_proxy# echo $socket_proxy# echo $no_proxy# echo $all_proxy# unset http_proxy# unset https_proxy# unset ftp_proxy# unset socket_proxy# unset no_proxy# unset all_proxy# export http_proxy=http://8.8.8.8:80(补充:这里以无密码的代理 IP 和端口 8.8.8.8:8080 为例)
或者:
# setenv http_proxy=http://8.8.8.8:80(补充:这里以无密码的代理 IP 和端口 8.8.8.8:8080 为例)
# vim /etc/profile添加以下内容:
……
export http_proxy=http://8.8.8.8:80
export https_proxy=http://admin:123@8.8.8.8:8080
export no_proxy=”localhost, 127.0.0.1, ::1″
(
补充:这里以设置
1) 无密码的代理 IP 和端口 http://8.8.8.8:80
2) 有密码的代理 IP 和端口 http://8.8.8.8:8080
3) 排除 localhost、127.0.0.1 和 ::1 为例
为例
)
(注意:如果密码中也有一个 “@” 符号,则需要把 “@” 符号转义一下,转义成 %40)
# source /etc/profile# echo $http_proxy
# echo $https_proxy# screen -S <screen window name>(补充:这样会同时创建并且进入 screen 窗口中)
(步骤略)
同时按下 “ctrl” 键和 “a” 键和 “d” 键
(补充:这里 d 代表的是 Detached 的意思)
# screen -d <screen window name># screen -ls
6474.1 (Attached)
29438.2 (Detached)(
补充:这里以显示
1) 激活状态(Attached)的 screen 窗口 1 为例
2) 挂起状态(Detached)的 screen 窗口 2 为例
)
# screen -r <screen window name># screen -d <screen window name>(注意:此时正在使用这个 screen 窗口的人会断开)
# screen -r <screen window name># screen -d -r <screen window name>(注意:此时正在使用这个 screen 窗口的人会断开)
# screen -x <screen window name>(步骤略)
# exit(步骤略)
同时按下 “ctrl” 键和 “a” 键和 “c” 键
(步骤略)
同时按下 “ctrl” 键和 “a” 键和 “<screen window name code>”
(步骤略)
同时按下 “ctrl” 键和 “a” 键和 “w” 键
在创建 KVM 虚拟机之前要先安装 KVM 并创建 KVM 虚拟网络
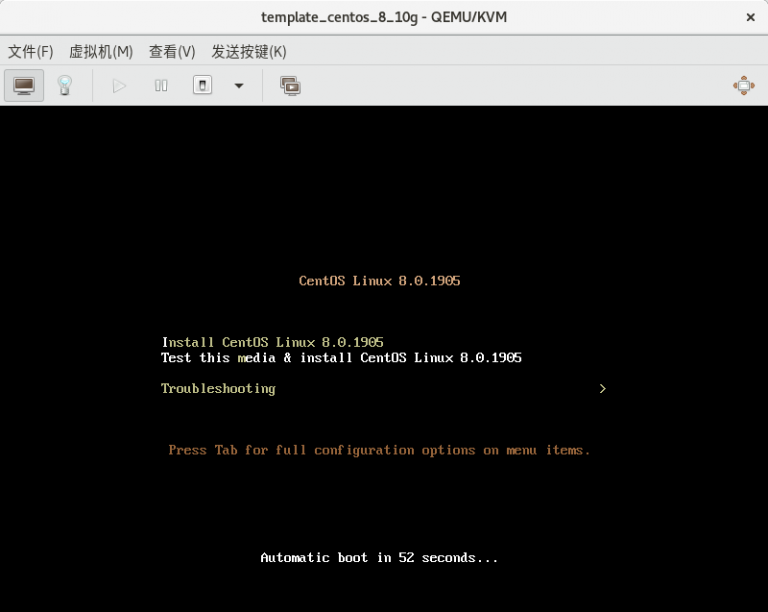
在 CentOS 官网上下载安装系统所需要的镜像:
主要用于批量克隆出新的 KVM 机器,节约创建新虚拟机的时间
(只在真机上执行以下步骤)
# qemu-img create -f qcow2 /var/lib/libvirt/images/template_centos_8_10g.qcow2 10G(补充:这里以创建 10G 大小的 template_centos_8_10g.qcow2 硬盘文件为例)
(只在真机上执行以下步骤)
# ls /var/lib/libvirt/images/ | grep template_centos_8_10g.qcow2(补充:这里以确认 template_centos_8_10g.qcow2 硬盘文件为例)
(只在真机上执行以下步骤)
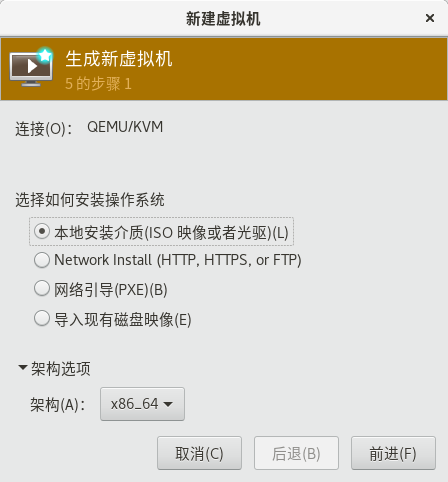
# virt-manager(只在真机上执行以下步骤)
(步骤略)
(只在真机上执行以下步骤)
(只在真机上执行以下步骤)
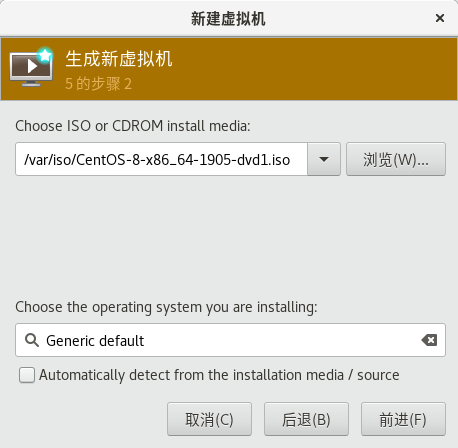
(补充:这里以使用 CentOS-8-x86_64-1905-dvd1.iso 系统镜像为例)
(只在真机上执行以下步骤)
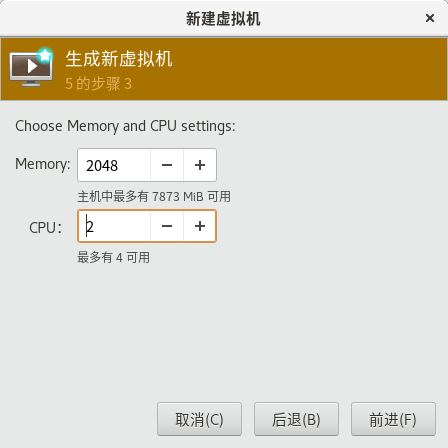
(补充:这里以设置 2048 MiB 内容和 2 核 CPU 为例)
(只在真机上执行以下步骤)
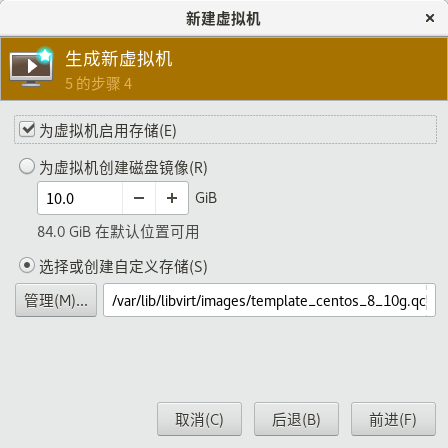
(补充:这里以使用 template_centos_8_10g.qcow2 硬盘文件为例)
(只在真机上执行以下步骤)
(注意:虚拟网络必须提前创建好)

(补充:这里以将虚拟机命名为 template_centos_8_10g 并使用 vlan001 网络为例)
(只在真机上执行以下步骤)
(只在真机上执行以下步骤)
(只在真机上执行以下步骤)
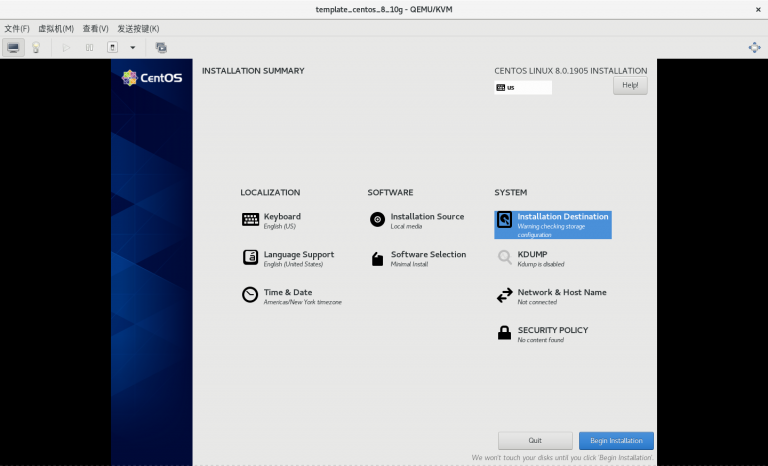
需要手动配置的地方有三个:
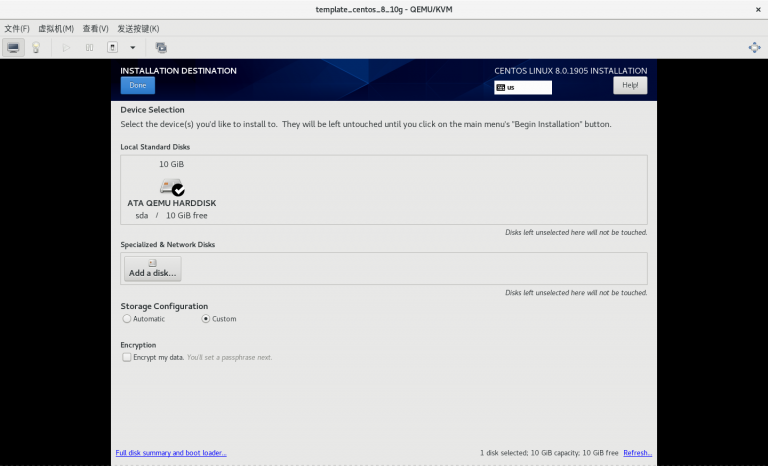
1) “INSTALLATION DESTINATION”
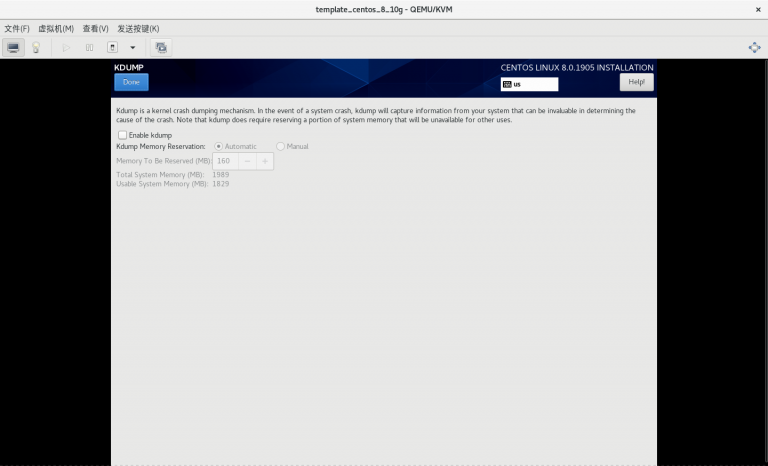
2) “KDUMP”
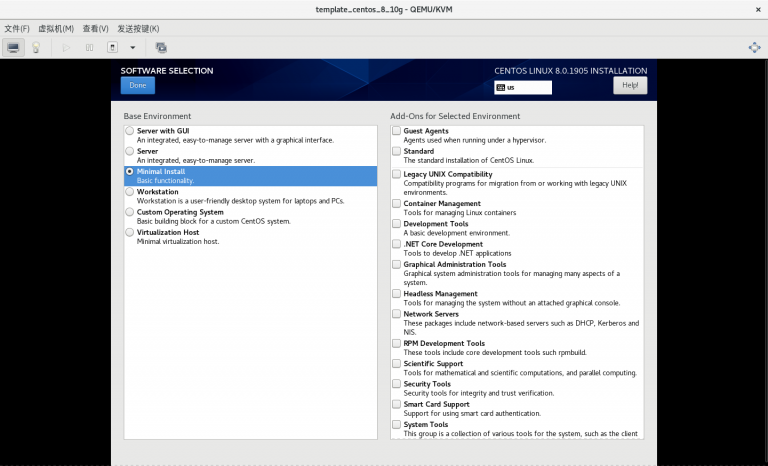
3) “SOFTWARE SELECTION”
分别点击以后就可以配置了
(只在真机上执行以下步骤)
(补充:完成后点击左上角的 “DONE”)
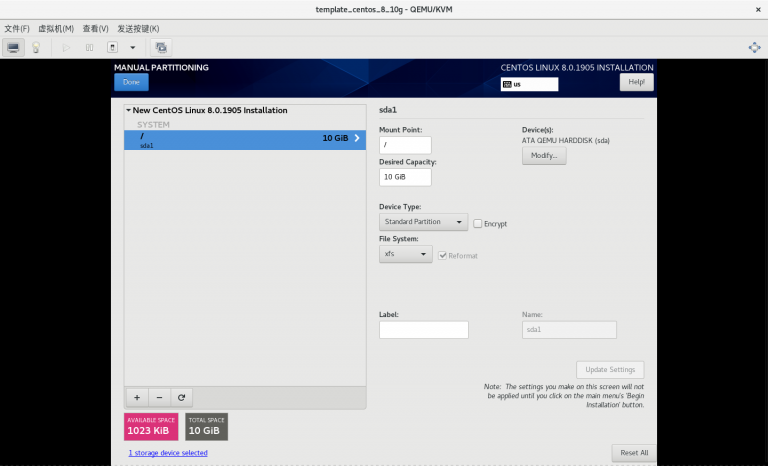
(注意:只分一个分区,只设置一个挂载点挂载到根,使用标准硬盘类型,硬盘格式设置为 XFS)
(只在真机上执行以下步骤)
(补充:完成后点击左上角的 “DONE”)
(只在真机上执行以下步骤)
(补充:完成后点击左上角的 “DONE”)
(只在真机上执行以下步骤)
(只在真机上执行以下步骤)
(只在真机上执行以下步骤)
1) 一定要使用刚刚创建的 /var/lib/libvirt/images/template_centos_8_10g.qcow2 作为安装虚拟机的硬件文件
2) 虚拟机网络 “vlan001” 要提前创建好
3) 只分一个分区,只设置一个挂载点挂载到根,使用标准硬盘,硬盘格式是 XFS
4) 取消 “KDUMP”
5) 选择最小化安装系统
(只在虚拟机上执行以下步骤)
# vi /etc/sysconfig/network-scripts/ifcfg-ens3将全部内容修改如下:
TYPE=Ethernet
BOOTPROTO=dhcp
NAME=ens3
DEVICE=ens3
ONBOOT=yes(只在虚拟机上执行以下步骤)
# reboot(只在虚拟机上执行以下步骤)
# vi /etc/selinux/config将全部内容修改如下:
# This file controls the state of SELinux on the system.
# SELINUX= can take one of these three values:
#     enforcing - SELinux security policy is enforced.
#     permissive - SELinux prints warnings instead of enforcing.
#     disabled - No SELinux policy is loaded.
SELINUX=disabled
# SELINUXTYPE= can take one of three values:
#     targeted - Targeted processes are protected,
#     minimum - Modification of targeted policy. Only selected processes are protected.
#     mls - Multi Level Security protection.
SELINUXTYPE=targeted(只在虚拟机上执行以下步骤)
# vi /etc/sysconfig/network将全部内容修改如下:
# Created by anaconda
NOZEROCONF="yes"(只在虚拟机上执行以下步骤)
# vi /etc/default/grub将全部内容修改如下:
GRUB_TIMEOUT=5
GRUB_DISTRIBUTOR="$(sed 's, release .*$,,g' /etc/system-release)"
GRUB_DEFAULT=saved
GRUB_DISABLE_SUBMENU=true
GRUB_TERMINAL="serial console"
GRUB_SERIAL_COMMAND="serial --unit=1 --speed=115200"
GRUB_CMDLINE_LINUX="biosdevname=0 net.ifnames=0 console=tty0 console=ttyS0,115200n8"
GRUB_DISABLE_LINUX_UUID="true"
GRUB_ENABLE_LINUX_LABEL="true"
GRUB_DISABLE_RECOVERY="true"(只在虚拟机上执行以下步骤)
# grub2-mkconfig -o grub(只在虚拟机上执行以下步骤)
# blkid
/dev/sda1: UUID="e76ed189-6d0f-49d5-8586-c5aae4bdc9b5" TYPE="xfs" PARTUUID="3d8377ef-01"
(补充:这里的 UUID 是: e76ed189-6d0f-49d5-8586-c5aae4bdc9b5)
(只在虚拟机上执行以下步骤)
# vi /etc/fstab将以下内容:
......
UUID=e76ed189-6d0f-49d5-8586-c5aae4bdc9b5 /                   xfs     defaults        0 0
(补充:这里的 UUID 是: e76ed189-6d0f-49d5-8586-c5aae4bdc9b5)
修改为:
/dev/sda1 / xfs defaults 0 0(只在虚拟机上执行以下步骤)
# yum -y remove firewalld-* python-firewall(只在虚拟机上执行以下步骤)
# mkdir /etc/yum.repos.d/backup(只在虚拟机上执行以下步骤)
# mv /etc/yum.repos.d/*.repo /etc/yum.repos.d/backup(只在虚拟机上执行以下步骤)
# vi /etc/yum.repos.d/lan.repo创建以下内容:
[CentOS8BaseOS]
name=CentOS8BaseOS
baseurl=http://192.168.100.254/CentOS8/BaseOS/
enabled=1
gpgcheck=0

[CentOS8AppStream]
name=CentOS8AppStream
baseurl=http://192.168.100.254/CentOS8/AppStream/
enabled=1
gpgcheck=0
(注意:http://192.168.1.250/centos8/ 需要根据真实环境的情况进行更改)
(只在虚拟机上执行以下步骤)
# yum clean all(只在虚拟机上执行以下步骤)
# yum repolist(只在虚拟机上执行以下步骤)
# yum -y update(只在虚拟机上执行以下步骤)
# yum install -y cloud-utils-growpart(只在虚拟机上执行以下步骤)
# chmod 755 /etc/rc.local(只在虚拟机上执行以下步骤)
# vi /etc/rc.local添加以下内容:
......
/usr/bin/growpart /dev/sda1
/usr/sbin/xfs_growfs /(只在虚拟机上执行以下步骤)
# vi /etc/hostname将全部内容修改如下:
template_centos_8_10g
(只在虚拟机上执行以下步骤)
# systemctl start serial-getty@ttyS0
# systemctl enable serial-getty@ttyS0(只在虚拟机上执行以下步骤)
# history -c(只在虚拟机上执行以下步骤)
# poweroff(只在真机上执行以下步骤)
# sudo virt-sysprep -d template_centos_8_10g(补充:这里以清理 template_centos_8_10g 虚拟机为例)
(
注意:如果此命令不存在
1) CentOS 系统的话需要安装 libguestfs-tools
2) openSUSE 系统的话需要安装 guestfs-tools
)
(只在真机上执行以下步骤)
Connection reset by xxx.xxx.xxx.xxx port 22# rm /etc/ssh/ssh_host_*# systemctl restart sshd